Wednesday, September 21, 2016

Fairy Ring Painting in the works!


Almost done
So I've been playing with my paints after taking the Jan Schmuckal course. I love her style, and she makes it look easy, but she's had lots of practice. This is my first one. It will be done in a few days, with final touches and refinement.

Here's how it started out.
First stain attempt
The premise of this "tonalist" style of painting is that you stain the canvas with a rich cherry-wood or mahogany colored stain made up of a selection of colors mixed with Liquin. Then you wipe out the light areas.
Same canvas, same pic, more wiping.
My picture is metamorphosing each time I work on it and I have no idea what I'm doing - just learning.


Final Stain updated
With a few changes to the background hill, I decided it was time to let it dry overnight and play with color the next day.
First attempt at color blocking
So here's what it looked like after I got half the color blocked in. I knew I still had a long way to go.

Still have no idea what I'm doing but it's fun!
And here I've loosely blocked in leaf masses, ground masses, sky masses, etc.


Starting to pull in clouds.
My photo reference didn't have any clouds that day, it was just a clump of trees, and I decided to go ahead and start using my imagination, so I started playing with sun and clouds.

Photo reference in color

Photo reference black and white
Dark, but starting to come together.
I played and played and got most of the leaf masses accounted for and some of the imaginary sun and clouds. Played with the fields and bushes a bit, and the foreground.

Here's where we are now.
Next steps are to pull out a bit more color in the clouds, a bit more around the base of the tree, and the fairy circle happening in the middle of the field at twilight between the tree and the hill. 

My style is not realistic, obviously, I am staying true to the world of my fairies, but I am also working towards the glow - the beautiful light that happens as the sun sets and the fairies begin to dance. Will post the finished picture and can't wait to start another. With this first one I've learned so much!

All comments most welcome! Does it speak to you in any way?

Namaste,
Jen


Thursday, September 1, 2016

Shakespeare's Midsummer Night's Fairy Cabochon Necklace is done!

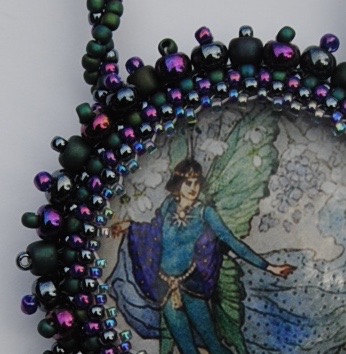
Beautiful colors of the Male Fairy Cabochon
I think I'm getting even better at making these beautiful cabochon necklaces.

This male fairy jumped into my hands the other day and he called for purple! and green! and dark steely blue! I listened.

Took me about half an hour to choose the beads to go around him and I felt so delighted to see them spread across the drafting table in my studio that overlooks the backyard, the birds, and the trees. My favorite spot in which to create that lets in soft breezes and sunshine.

Detail of the image Warwick Goble painted.

This cabochon that I made is a detail of an image Warwick Goble painted for William Shakespeare's Midsummer Night's Dream - published in The Fairy Book in 1920. I created the borders using peyote stitch, which we love! One difference between my work and the work of many other beaders is that I don't rely on just glue to hold my cabs - they're sewn in and will stay put with no surprises.
Top q u a l i t y xo
The complete image (nearly).
And what's better for a woman than dreaming outside on a warm midsummer's eve, softly cradled by Earth Mother herself?
Here's a photo of the necklace all done, yay.
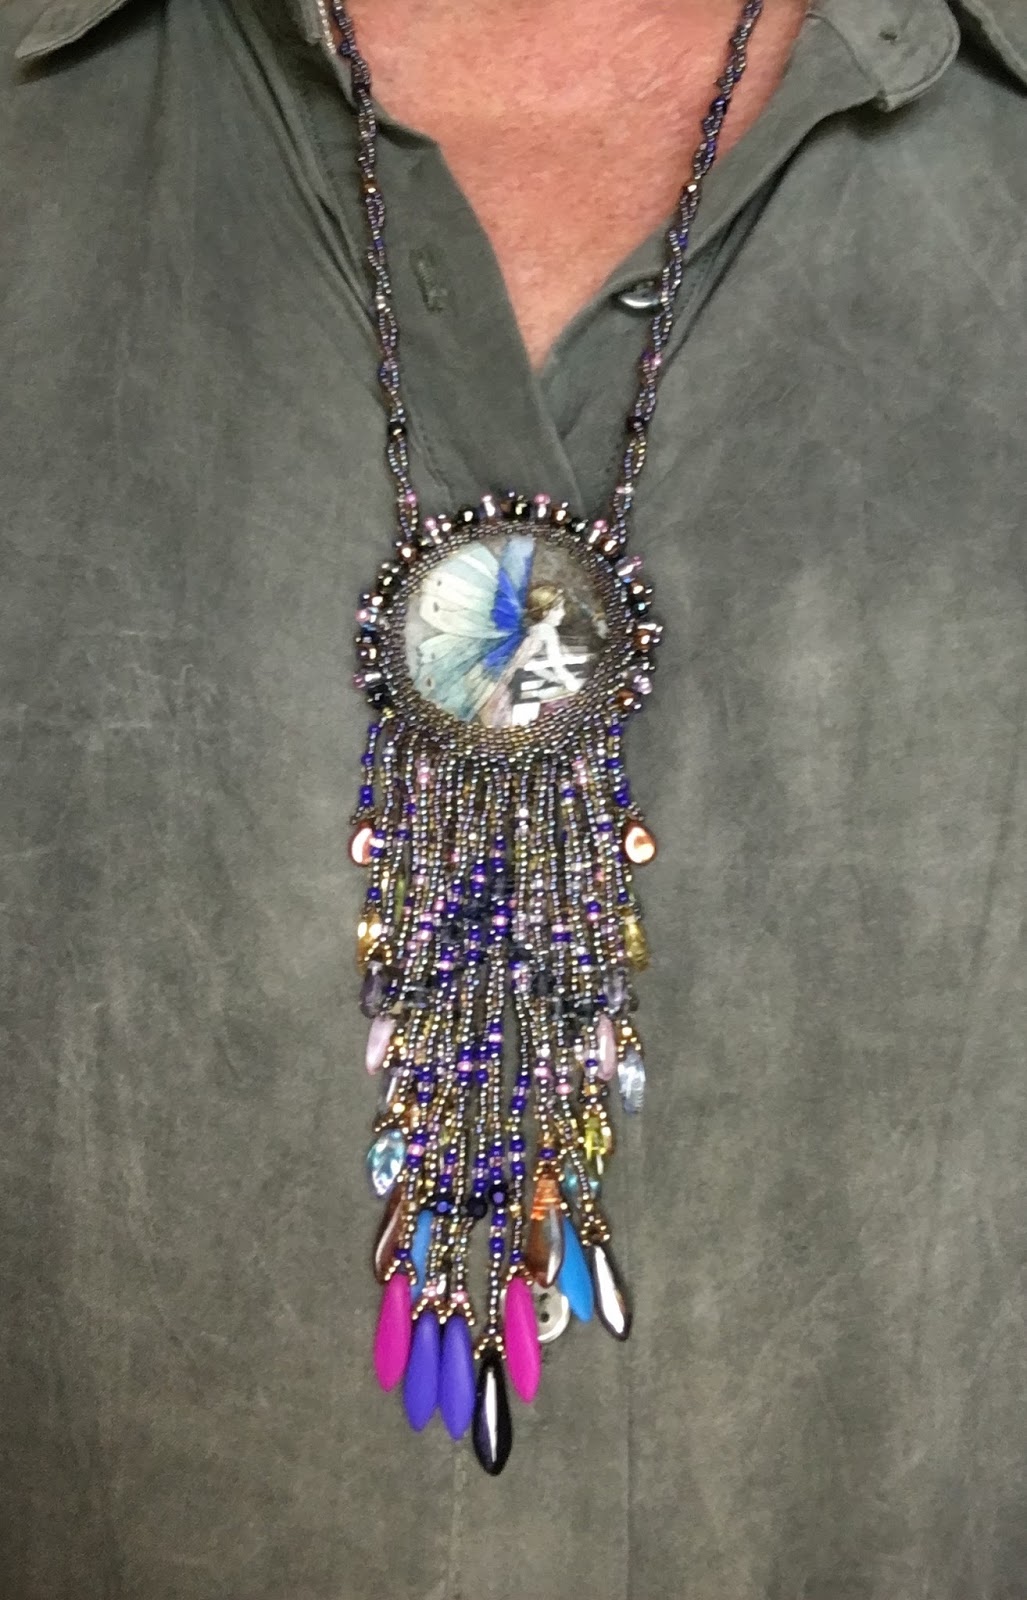
And this photo shows a bit of its personality. 
Male fairy asked for Earth elements in the fringe of this necklace, so we chose iridescent purply blue flower tips and soft iridescent leaves and gorgeous Czech teardrops, like dewdrops, for the fringe tips. 

It's strung on good, strong Fireline, which gives the fringe a bit of wiggle. I love it. 

Forest green for the back.


The back is finished in my favorite color, dark forest green Ultrasuede.

Necklace strap - 22 and 1/2 inches

Cabochon with fringe - 5 and 1/4 inches at longest point

Cabochon alone - 1 and 7/8 inches across (with border)

Hangs mid-chest.

Comes in a velveteen pouch for softkeeping.

Can be worn with everything, dresses, tanks, blue jeans, etc. - but wait til it's somewhat "seasoned" to wear with white or very pale colors as the dark green may rub off with moisture while it's new.

Good work, time well spent : ))

Thank you for visiting Dreamkeeper Creations! This necklace will be up in my Etsy shop for awhile, and in Green Drake Gallery for awhile after that til it finds its forever home.

Namaste,
Jen


Monday, August 22, 2016

A New Flirty Fairy Cabochon Long Necklace is Finished!

A fluttery winged fairy alights.

The image on this cabochon is by one of my all-time favorite illustrators, Warwick Goble, and it's called Fairies at the Cradle. His original design was used as the frontspiece for The Book of Fairy Poetry in 1920. I love the image, not only for its soft style, but also because I have always enjoyed imagining fairies and angels watching over my children.

Warwick Goble's illustration of Fairies at the Cradle.
The start of the project.
This little fairy wanted to be celebrated, and worn next to her caretaker's heart, so she jumped into my hands along with my favorite iridescent coppery rainbow seed beads, about 6 feet of FireLine, and a needle about as thin as a hair. I affixed her to a piece of Lacy's Stiff Stuff, which I had previously dyed black, and then I began to sew and sew, using the beautiful peyote stitch.

Fringe happening!
After the inside border was finished, she helped me choose a selection of fringe tips - top quality Czech glass dagger beads, iridescent blue glass leaf beads, and tiny copper droplets for the outside fringe strands. The first side of the fringe is always kind of exciting since I don't know what pattern will slowly appear until I'm right in the middle of it! The second side is easy, because all I have to do is match.

It's kind of like she's "spreading her skirt."
After the fringe is finished, she guides me to choose the pattern and colors of the larger beads around the outside border. These are 6 ott (6/0) beads. They crown the top and sides of the cabochon beautifully.
On to the necklace strap.
After the pendant part is finished, she asks me to weave the necklace strap, so I do, using some of the 6/0 beads to decorate it. I pull the FireLine through each of the two strands in the necklace strap twice, so it's strong and will last a long time. Then the trickiest part comes along - I have to trim the Lacy's Stiff Stuff off very close to my stitching, without catching any of the fringe strands or necklace straps or bead borders with my tiny, sharp scissors. I usually hold my breath while I do this part, and sometimes I pray too. Lord, pleeeease don't let me snip anything extra, pleeeeease, pleeeeeease! Thanks!!

Ta da!
And the last step is to sew the blue Ultrasuede backing onto the back to finish off the piece. This is tricky too, as it also needs trimming, after a dab of glue to hold it in place. Around the edge I pick up a single bead with each stitch and, once I'm around the circle I go through each of those beads to make a nice smooth border. Then, TA DA! It's finished!

Such a happy fairy necklace!
She likes to be worn with anything. Soft green tunic....
Paisley tunic....
White, or any solid color....
Flirty fairy necklace!
She will be available at Dreamkeeper Creations on Etsy for a few weeks, and then at the Green Drake Gallery.

Thanks for visiting!

Namaste,
Jen

Sunday, July 3, 2016

Communications with My Sweet Jess xo

The cover of our journal
So my new relationship with my daughter after her crossover began with a very special journal that my two best ever Earth Angel Lovies gave to me. It's a journal designed by Laurel Birch, who surmounted some major challenges while she was here on Earth, so, extra special. I probably shouldn't say it "began" then, because Jess did, and continues to do occasional electrical stuff and songs and numbers, but the relationship with my sweet Jess certainly deepened.

This special journal sat on one of the bookshelves in my studio for several months and then one night I was really missing my daughter and I pulled it out and wrote her a letter, which I will share with you. (You can click on the images to make them larger.)


First letter I wrote to Jess


I was pretty sure she could see what I had written, and feel it as I wrote it. She could feel me reaching out to love her, and express my concerns.

I wrote several entries over a period of several months, which made me feel closer to her - somewhere in my soul I knew she "heard" me, she "received" the communication.

Then one night the idea came into my mind to write a letter from her to me. Well, wasn't I pleasantly surprised - it was beautiful.


First letter from Jess
xoxo
Well this made my heart feel lighter, and I loved it. I didn't know at the time that there was a name for the process we were doing, which I found out later. In the course of conversation with some people I trust absolutely, who are knowledgeable about alternative medicine, and energy work, I learned that here in this town where I live, there lives a psychic medium. Well, I thought, why not go see her? So I called and made an appointment to visit with her for an hour and see what would come about. Wow, it was so special.

For those who might be interested in a session themselves, her name is Desiree Dennis, and her whole family is wonderfully fascinating. Her grandfather is a veterinarian. Her mother is an energy worker and does a number of wonderful things. Her brother is very talented in a number of ways, and she, herself, is the most unassuming, charming, genuine individual who truly cares about her clientele. (Funny aside here - when we went into the room where she does her sessions with people there are three chairs. She sits in the middle one. Her client gets to pick which chair to sit in, either on her right, or on her left. She said it's so amusing that most of her "Penn State" clientele tends to choose the right-hand chair, and most of her "artsy, creative, spiritual" clientele tend to choose to sit on her left. Yes, I sat on the left, that's where the tissue box was : )

During our session, which was an hour long, and recorded, one of the things Desiree said was that Jess loves our letters and wants me to spend more time writing, both to her from me and from her to me. Desiree explained that there is a name for this process, and it's called "automatic writing." She also said there's a tree that's special to Jess and myself, and Jess wants me to know that if I go sit under our tree she'll come and talk with me. I happen to know this would be the peach tree by our pergola in the back yard, where we sat on the grass at sunset, and where Jess pranced through a little pathway bordered by mushrooms that had sprung up from the recent rains while she was visiting us. Yes, I've sat there, and yes, we've had wonderful conversations.

But I digress - I've spent some more time doing this "automatic writing" thing, and can say it lightens my heart and in each of Jess's letters there's at least one "zinger," which is what I call something I wouldn't normally write or even think of myself. These zingers give me insight or encouragement or turn a lightbulb on in my head and heart. They're gifts.


She guards me when she feels I've had enough to process - she says "Gotta go!" And I appreciate that.


She's talking here about the little creatures that our cat, Joey Max brings to us. I bury them in the front garden with flowers and prayers.

~Laurel Birch

Thank you Laurel Birch for being a big spirit while you were here. Thank you Desiree for your facilitation and encouragement. Thank you my sweet Jess for being accessible and sharing your adventures. 

Just LOVE. All good. 

We are working together and it is so fun. If you'd like to try "automatic writing" with someone you love who's in our true home, here are some tips:
  • Make yourself comfortable (you might not want to be interrupted)
  • Light a candle
  • Put your favorite music on or go out in beautiful Nature
  • Bring with you a beautiful journal and something to write with
  • Breathe deeply a few times and ask for the blessing of Our Creative Source (whatever you call that) and the highest source of communication
  • Then write what comes to mind without questioning or "editing" it (it's so interesting to read later). Don't think, analyze, or question, just write. That way the message comes through with more purity and not so much of "your" spin on what you're getting.
  • You might feel an urge to change your handwriting, for example, Jess prefers me to print rather than write in full cursive, just go with it.
  • After you feel you're done, say thank you and close out the session with gratitude.
Questions? Feel free to contact me at dreamkeepercreations@gmail.com or have a session with Desiree, you'll love her. She's very down-to-earth.

Fear? None. "The only thing to fear is fear itself." ~ Franklin D. Roosevelt via Louis McHenry Howe

Love? All there. 

Try it. You'll love it. And it will love you back. 

I will also add that I've captured Jess's loving spirit in photos occasionally. A beautiful soft pink orb so huge it surrounds me.

See the round pink orb shape that almost takes over the whole photo?

Here's another photo taken seconds later.
AND when I chose the pink orb photo to upload it the other (second) photo uploaded by itself without me choosing it. Hi Jess xo : ) The cool thing about the first photo is that as soon as I saw it I felt an overwhelming sense of PEACE. I just love that. 

I think this kind of communication is good and healthy, and pretty much available to us all. 

Lots of food for thought here. Shared with love.

Namaste
Jen


Friday, July 1, 2016

Multicolor Abstract Gemstone Peyote Stitched Cabochon Necklace

Floofy fun!
For this abstract art necklace, I chose ruby agate, turquoise howlite, green agate, and golden tiger's eye cabochons and arranged them against a black seed bead background, dotted with occasional sparkles of colored glass beads.

Each cabochon is bordered by several rows of peyote stitching in beautiful shiny colored seed beads. 


Happy floral multicolored fringe!
I had the most fun creating the fringe on this necklace! It includes adorable glass floral beads in dark iridescent blue/purple, soft pink, and green. And I love the little round glass beads in fun colors on the edges and the sparkly yellow bead tips, as well as the cobalt blue teardrop shaped beads, which suggest the rains that come to make the flowers grow.


Detail
Here you can see the glowy cabochons and the floofy little skirt that plays around the bottom of the piece.


The back
The back of this piece is a soft maroon Ultrasuede.


The whole piece
And here you can see the whole piece, with its multicolored necklace strap.

Total Length - Hangs to about 19 inches (necklace strap is 28 inches)

Length of abstract focal piece is 5 inches 

Width of abstract focal piece is 1 and 1/8 to 1 and 3/4 inches at its widest point


Soft velveteen pouches
Comes in a soft velveteen pouch for softkeeping.

This necklace will be posted in my Etsy shop, Dreamkeeper Creations, as long as it's available.

Thanks for taking a peek!
Namaste,
Jen